La medición de potencia cada vez está cobrando más importancia dentro del mundo del ciclismo. No sólo a nivel profesional, donde la medición de potencia es básica para cualquier corredor, sino cada vez más entre los aficionados, sobre todo en el triatlón. Tanto a la hora de preparar tus entrenamientos como para elegir una táctica de carrera, trabajar enfocado a los watios que eres capaz de producir es sin duda la forma más eficaz de competir.
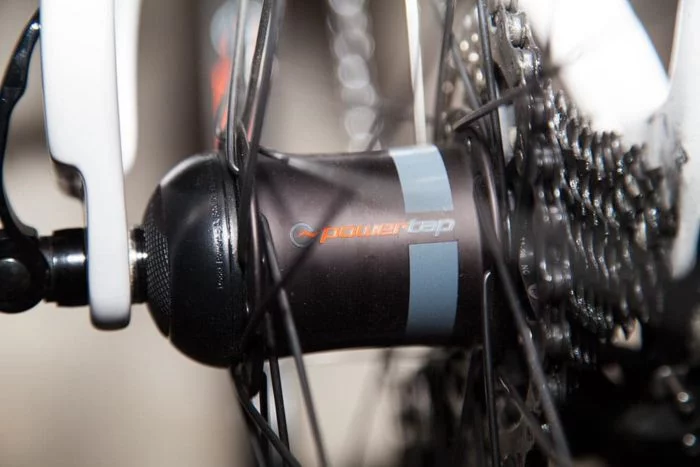
Uno de los fabricantes de potenciómetros más conocidos es PowerTap. Llevan unos cuantos años ofreciendo la medición de potencia en el buje trasero de la bicicleta, concretamente desde el año 1998. Este PowerTap G3 que verás hoy en la prueba es su último buje que, además, ha visto reducido su precio recientemente.
¿Eres nuevo en la medición de potencia? Puedes echar un vistazo al artículo que publiqué hace unos días, te servirá como guía para conocer un poco más acerca de la historia y de los diferentes puntos donde es posible obtener datos del ciclista.
Tamalpais, distribuidor en España de PowerTap, me ha facilitado una rueda de entrenamiento para realizar los diferentes análisis de datos durante estas últimas semanas. Y una vez terminado con los diferentes test a los que la he sometido la enviaré de vuelta, no hay nada que se quede conmigo. Por supuesto este tiempo he estado usando otros medidores de potencia con el objetivo de comparar los datos obtenidos, sin los cuales este tipo de pruebas no tendría ningún sentido.
No te entretengo más, vayamos con el análisis completo.
Navegar a secciones específicas
Desempaquetado
Para los que no seáis totalmente nuevos en la página, ya sabéis que normalmente recibo el producto completo en su embalaje, el mismo que tú recibirías cuando tu lo compras. En este caso es algo diferente, pues lo que he recibido es una rueda de entrenamiento que, antes de llegarme a mi, había estado en diferentes campus de entrenamiento. Es decir, no es una unidad nueva, pero supongo que está convenientemente ajustado por Tamalpais.
Pero por continuar con algo que ya se ha convertido en tradición, vamos con el desempaquetado, pero algo diferente.
Como digo, en este caso el PowerTap G3 vino junto con una rueda de entrenamiento, así que la caja es bastante más grande de lo habitual.
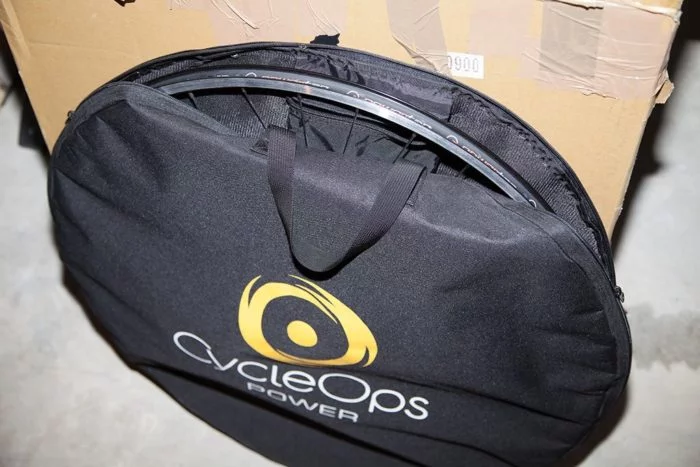
Dentro de esa caja, en su propia funda, la rueda de entrenamiento de PowerTap. Es una rueda normal, de aluminio y peso estándar. Sin perfil, dura y resistente. Perfecta para hacer kilómetros y kilómetros por cualquier tipo de asfalto sin preocupaciones, pero no sería lo que quieres usar para tu día de competición.
Y con la rueda fuera de la funda, lo único que queda es colocarla en su lugar. Qué rápido he terminado hoy el desempaquetado, ¿verdad?
Instalación
Puedes adquirir el PowerTap G3 de dos formas diferentes. En primer lugar, como buje por separado, en cuyo caso lo más normal es que lo adquieras junto con alguna rueda que encargues a tu montador de confianza o que sustituyas el buje de tu rueda actual, en cuyo caso lo habitual es que lo lleves a tu mecánico de confianza a realizar el radiado de la rueda y éste te la entregue totalmente montada, con tu flamante potenciómetro.
Hay una segunda posibilidad, que es adquirir la rueda directamente a PowerTap de entre las diferentes ofertas que ofrecen. Desde una rueda básica de entrenamiento con aros de aluminio (como la que ocupa esta review) hasta diferentes ruedas de perfil fabricadas en carbono, incluso con posibilidad de aros Enve, Zipp o HED.
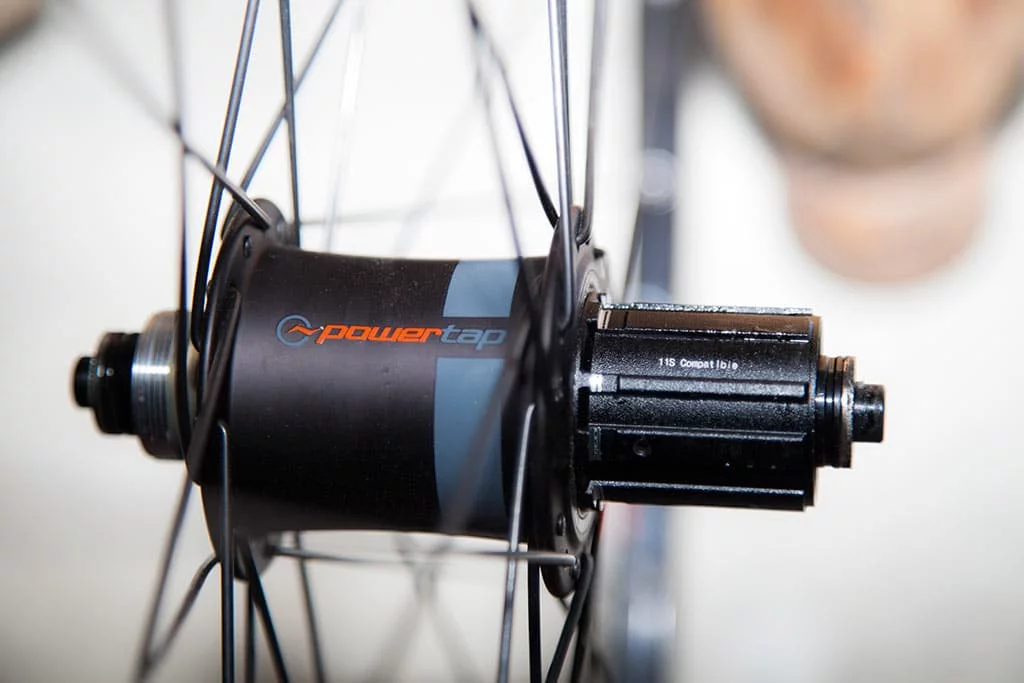
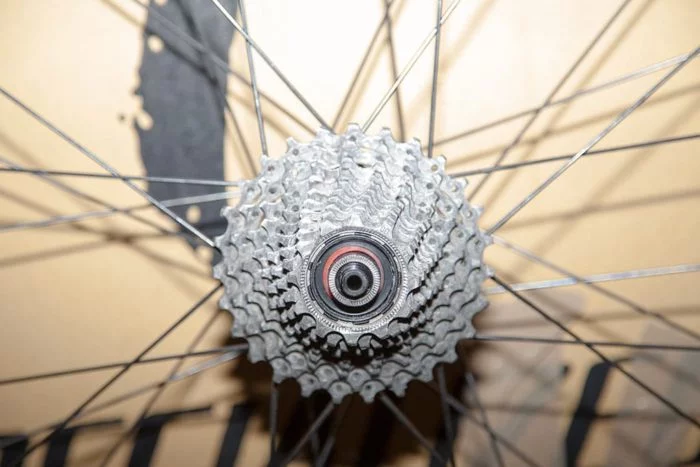
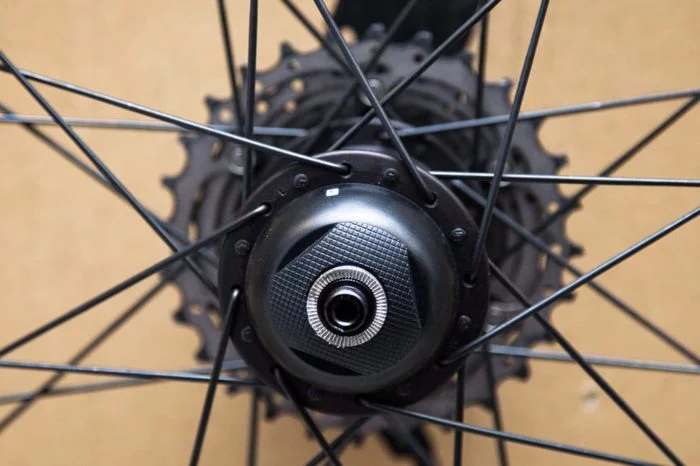
En cualquiera de estos casos, lo único que tendrás que hacer es montar unos piñones en el núcleo del buje (disponible para Shimano/SRAM o Campagnolo). No tiene ningún misterio, simplemente debes fijarte que el cuerpo de la rueda tiene varias muescas donde colocar los piñones. Una de ellas es más fina que las demás, será la que te sirva de guía
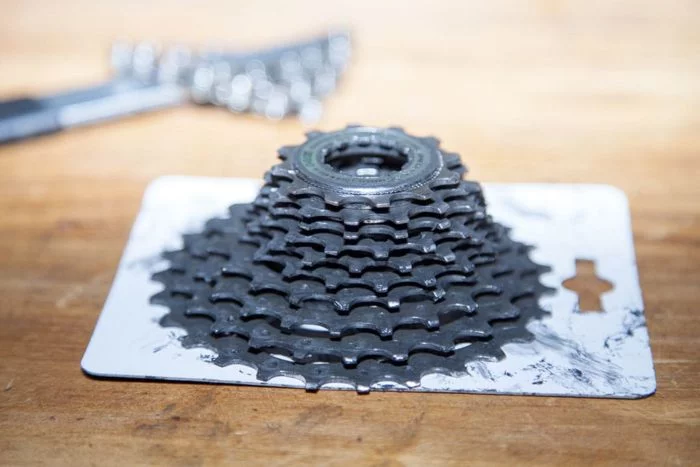
Con lo único que debes tener cuidado es con no perder el orden de los piñones. Y más que el orden de estos, tener claro dónde se colocan los separadores. Así que colócalos de forma forma ordenada e introdúcelos poco a poco en el cuerpo para evitar confusiones.
Así es como quedarán cuando ya estén introducidos todos en el buje, a falta de la tapa. Colócala a rosca, comenzando a apretar con los dedos.
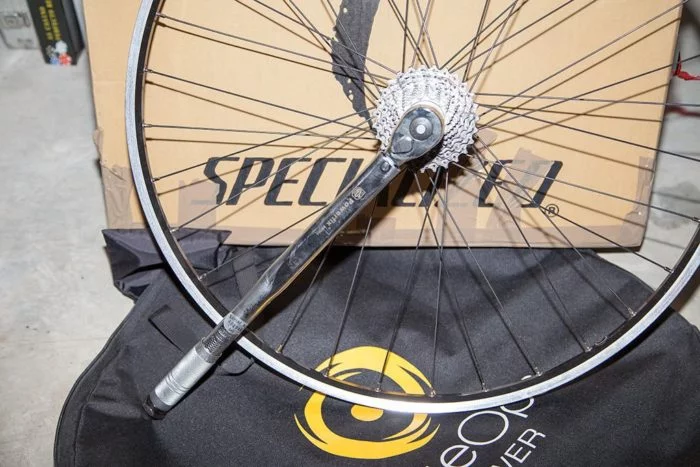
Por último tendrás que echar mano de la llave de piñones y una buena palanca. Para fijar el tornillo no necesitarás nada más, pero cuando quieras sustituirlos tendrás que ayudarte de una llave de bloqueo de piñones que permitirá sujetar el cuerpo y evitará que gire libremente.
Una vez montada la rueda con el buje no necesitarás más de 5 minutos para colocar tu cubierta o tubular (bueno, el tubular llevará un poquito más de tiempo).
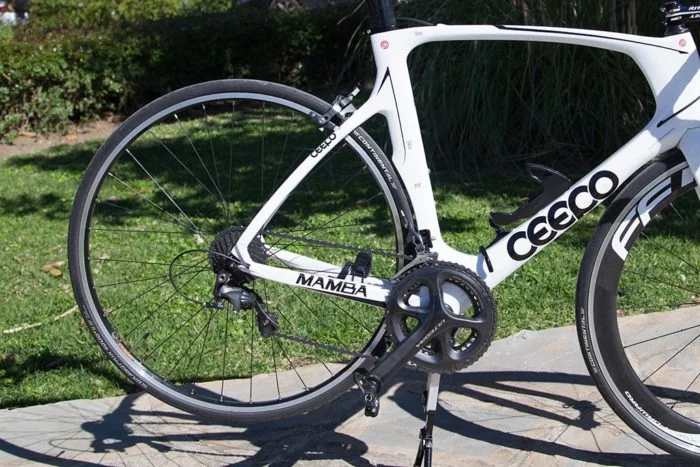
Y si quieres pasar tu PowerTap a una bici diferente, lo que tardes en quitar una rueda y poner la otra.
Calibración
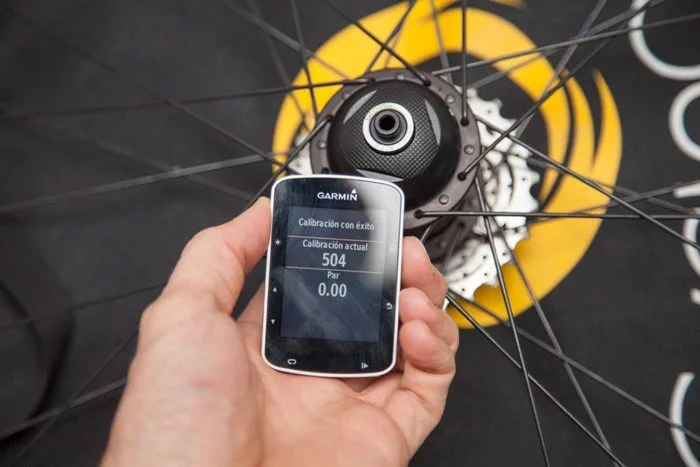
Lo mejor que tiene el buje de PowerTap es su simplicidad y facilidad de uso. Es algo que está ahí, que simplemente funciona y de lo que únicamente te acordarás cuando toque cambiar la pila. Y es que ni siquiera es necesario que realices una calibración antes de cada salida o entrenamiento.
Por supuesto que puedes forzar la calibración desde el ordenador de ciclismo que utilices, pero en realidad no estarás calibrando nada. Simplemente le estarás indicando a la unidad cuál es el estado cuando no hay carga. El procedimiento es muy similar al que se hace con cualquier otro medidor de potencia
- Activa el medidor de potencia pedaleando hacia atrás o hacia adelante.
- Estando parado y sin aplicar ningún tipo de presión, inicia el procedimiento (desde las opciones del medidor de potencia en tu unidad).
Listo, ya puedes comenzar a dar pedales como un loco. Pero como digo, este procedimiento ni siquiera es necesario realizarlo, porque PowerTap tiene la función de auto-cero que por defecto está activada (y te recomiendo que así permanezca). Esta característica permite que cuando avanzas sin pedalear se lleve a cabo una calibración de forma automática. El buje detecta que no hay pedaleo al no haber torsión y, por tanto, la potencia en ese momento es cero. De esta manera la medición de potencia es siempre precisa, independientemente de los posibles cambios de temperatura. Como ves, todo simplicidad.
Conectividad
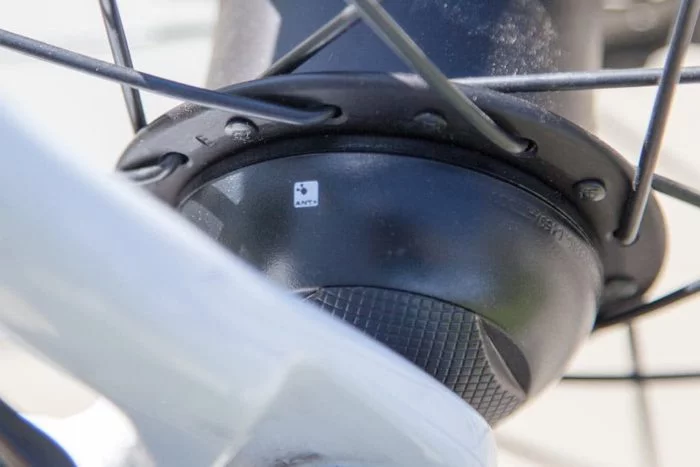
Cuando compras el PowerTap G3 es sólo compatible con el protocolo ANT+. Aunque PowerTap tiene su propia unidad de ciclismo (el Joule), gracias a este protocolo universal podrás usarlo con cualquier unidad de ciclismo o reloj que tenga conectividad ANT+ y soporte el uso de medidores de potencia en ciclismo (como los Garmin Edge o relojes de triatlón).
Pero debes tener en cuenta que hay unidades de ciclismo que aunque soportan ANT+ no disponen del soporte para medición de potencia (como el Garmin Edge 25). Y unidades o relojes con soporte para sensores Bluetooth que no serán compatibles con el PowerTap G3, al menos de forma directa.
Para esto último hay solución, pues se puede sustituir la «tapa» del buje por otra que transmita los datos a través de Bluetooth y adicionalmente, también hay otra tapa con tecnología dual, transmitiendo de forma simultánea a través de ANT+ y Bluetooth. Pero en ambos casos se añaden como opción, ya que la tapa que incluye la versión estándar de PowerTap G3 sólo dispone de conectividad ANT+.
A partir de aquí, simplemente deberás realizar la búsqueda de dispositivos desde tu reloj u ordenador de ciclismo compatible y añadirlo al listado de sensores externos.
Sustitución de la pila y actualización
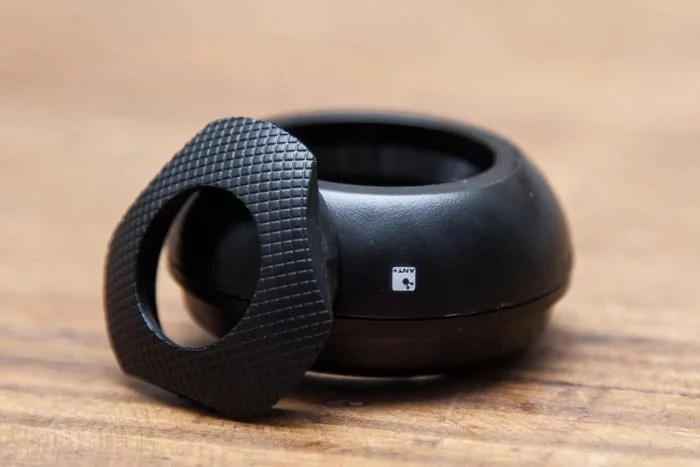
Y hablando de tapas, es ahí donde reside toda la electrónica. Por tanto es lo que tenemos que desmontar para sustituir la batería cuando se agote (pila de botón CR2032, fácil de encontrar en cualquier supermercado). También vas a encontrar un puerto micro USB que, conectándolo por cable al ordenador, te permitirá actualizar el firmware tan pronto como PowerTap facilite nuevas versiones.
El cambio es muy sencillo. Simplemente deberás retirar la tapa del buje con la herramienta que se incluye con el buje. La ubicación es, lógicamente, en el extremo contrario a donde instalas los piñones. Yo no disponía de esa llave específica, pero es muy sencillo girarla con un simple destornillador plano. Pero supongamos que tú si tienes la herramienta correcta.
Una vez quitado el tornillo de plástico que bloquea la tapa, para extraer el módulo tendrás que ayudarte de un destornillador plano o de una púa de plástico.
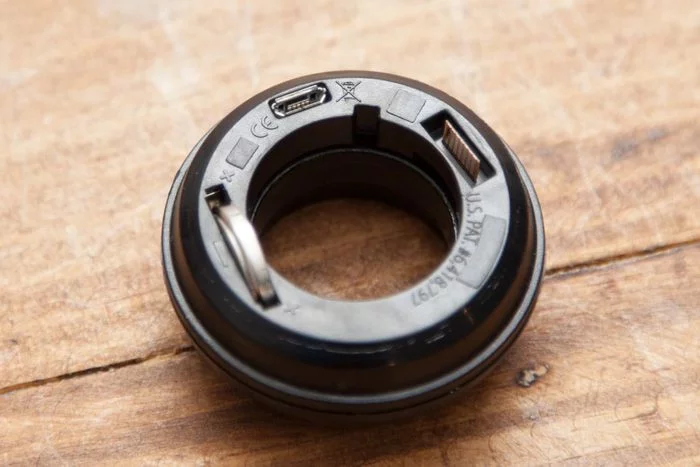
Si le das la vuelta a la tapa verás el zócalo para la pila. Simplemente tienes que extraerla y cambiarla por una nueva. En caso de necesitar actualizar el módulo de conexión, podrás hacerlo con un cable micro USB estándar.
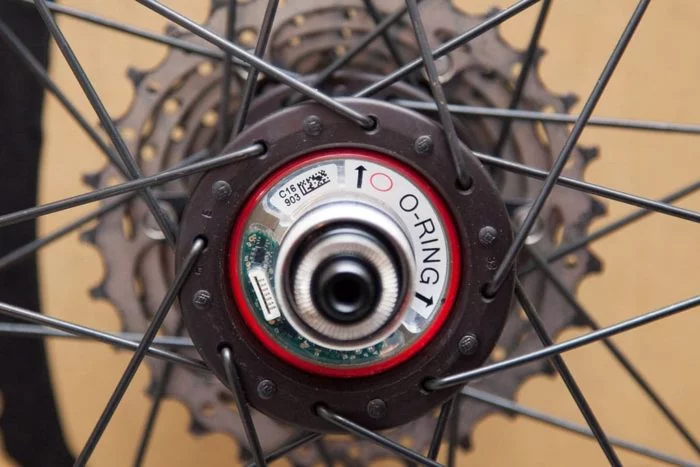
Y por si tienes curiosidad, así es como se ve el buje con la tapa retirada. Aquí es donde se encuentra la parte más importante del medidor de potencia, lo que he retirado se ocupa simplemente de la parte de conectividad.
¿Prefieres un vídeo? No te preocupes, PowerTap tiene una guía completa donde detalla el procedimiento.
Seguro que en vídeo lo has visto más claro.
Detalles a tener en cuenta
Por la ubicación del potenciómetro en la bicicleta hay algunos detalles que debes tener en cuenta. En primer lugar, es obvio que está al final de la cadena de transmisión, lo que significa que la medición que tienes no es necesariamente tu potencia como ciclista, sino la potencia que llega de forma efectiva a la carretera. Es decir, que tu puedes estar desarrollando 280W pero en pantalla ver 270W. ¿Y dónde están esos 10W de diferencia? Pues en la transmisión.
Es sólo un ejemplo y no siempre tiene que haber esa diferencia. Puede haber más, o puede haber menos. Depende de muchos factores, como la rigidez del cuadro, el estado de la transmisión, los rodamientos del pedalier, etc.
Para que lo entiendas claramente, imagina pedalear cuesta arriba con una bicicleta de suspensión total sin bloquear el amortiguador trasero. Evidentemente con cada pedalada el amortiguador se comprimirá, perdiendo algo de potencia. Por tanto, la potencia que estás aplicando no es la que llega al suelo, porque estás sufriendo pérdidas por el camino. O como me ocurrió en una ocasión, un pedalier demasiado apretado que no giraba correctamente. Mi potencia sobre los pedales era bastante elevada, pero todo mi esfuerzo se quedaba en girar los pedales y al buje apenas llegaba potencia.
¿Es esto malo? No, no es ni bueno ni malo, simplemente como es. Al final la cifra que tu verás y con la que prepararás tus entrenamientos será constante, y es ese dato con el que vas a trabajar. Aunque generalmente en ciclismo de carretera apenas habrá diferencias entre la potencia aplicada en los pedales y la que llega al suelo, siempre que lleves un correcto mantenimiento de la bicicleta.
No sólo potencia, también cadencia y velocidad
Por concepción, un potenciómetro también debe calcular la cadencia, ya que para medir la potencia total necesita no sólo la fuerza aplicada, sino también la velocidad angular (es decir, la cadencia). Por tanto esto también se enviará a tu ordenador de ciclismo, así que podrás prescindir de cualquier otro sensor de cadencia que tengas montado en la bicicleta.
Dependiendo de la ubicación del potenciómetro se podrá obtener de una forma u otra (usando imanes o acelerómetros). En el caso del PowerTap G3, será a través de un acelerómetro interno y su propio algoritmo de cálculo, ya que a diferencia de un medidor de potencia instalado en platos o bielas no puede medir las revoluciones por minuto de manera constante por la posición de la biela o las veces que detecta el giro.
Así mismo, el buje PowerTap también envía información acerca de la velocidad. Esto es muy fácil de calcular, pues el buje puede conocer perfectamente la velocidad por la rotación del mismo. Por tanto, además de la cadencia como cualquier otro medidor de potencia, también tendrás datos de velocidad (y, consecuentemente, distancia) de forma mucho más fiable que si sólo usas datos GPS.
Precisión como medidor de potencia
Información acerca de las pruebas
Antes de ir con los fríos datos, me gustaría hablarte un poco acerca del proceso de prueba de los medidores de potencia. En primer lugar, probar un potenciómetro de forma correcta es muy complicado (y tremendamente caro). Analizar un sólo dispositivo no sirve de nada, pues no sabemos si los datos obtenidos son válidos o no. Es como probar un sensor de pulso óptico y no compararlo con nada más. Sí, lee datos de pulso, pero… ¿son correctos?.
Tiene que haber otro dispositivo que pueda confirmar que esos datos obtenidos son correctos, para poder dar validez. ¿Pero qué ocurre si los datos de ambos difieren? Es entonces cuando necesitamos, al menos, un tercer medidor de potencia, que es el que dará la perspectiva adecuada. Por supuesto, cada uno enviando datos a su unidad correspondiente. Y todo suma varios miles de euros en material.
A todo esto hay que sumar el problema de tener un procedimiento claro de actuación. Cualquier fallo en dicho proceso puede dar al traste con una sesión completa de pruebas y análisis de datos.
- Calibrar de forma individual cada uno de los medidores de potencia, y todos en el mismo momento, para después poder tener en cuenta el ajuste de temperaturas que realiza cada uno de ellos.
- Emparejar cada uno con su unidad correspondiente, con la que tomaremos los datos de ese potenciómetro en particular.
- Confirmar que todas las unidades están grabando datos de forma similar (cada segundo, incluyendo ceros, etc).
- Iniciar la grabación de datos de forma simultánea para que luego pueda comparar los resultados de forma efectiva sin tener que hacer numerosos ajustes. Esto es bastante más fácil decirlo que hacerlo.
- Asegurarse de que todos y cada uno de los aparatos utilizados para las pruebas tenga suficiente batería tanto al inicio de la prueba como para que aguante hasta el final de la misma.
Son muchos pequeños detalles los que hay que tener en cuenta antes de poder iniciar cada entrenamiento. Y como digo, un ligero fallo en cualquiera de esos pasos puede hacer que una sesión de pruebas programada no sirva absolutamente para nada.
Datos de potencia
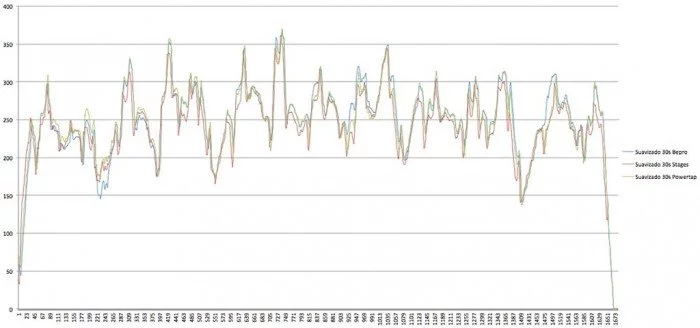
Empezaré con la primera prueba tras la instalación inicial. Esta prueba no la tomo en cuenta, pues aún las cosas están en proceso de asentamiento (sobre todo en el caso de los pedales bePRO). La gráfica está suavizada 30 segundos para facilitar la vista de los datos. Más o menos están los tres en los mismos rangos, pero con diferencias puntuales.
Como digo, aún no quiero empezar a sacar ningún tipo de conclusión, pero me sirve para que puedas ver como es el asentamiento inicial en la primera prueba.
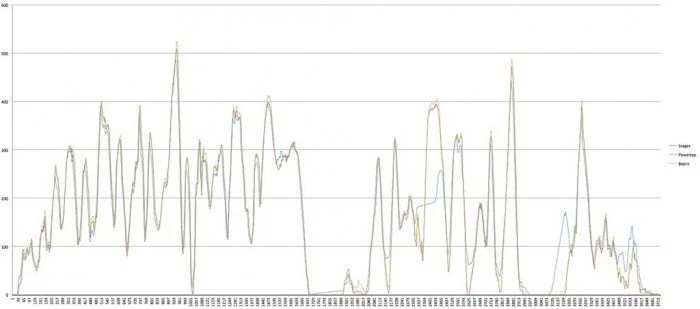
En esta segunda prueba verás que las cosas están mucho más alineadas, sobre todo en la primera parte de la ruta. Hay un par de puntos donde Stages está totalmente fuera de la gráfica, pero no es defecto de detección de potencia sino una desconexión puntual con el dispositivo con el que estaba grabando datos a través de ANT+ (de la potencia de señal de Stages ya hablaré en su análisis correspondiente).
Si amplias la imagen verás que en ocasiones hay alguna diferencia apreciable, sobre todo en los picos. Estas diferencias pueden tener su origen por lo siguiente:
- En primer lugar, la frecuencia de grabación de los dispositivos. Los medidores de potencia normalmente registran datos a una tasa de 8 muestras por segundo. Por su parte, las unidades de ciclismo y los relojes graban una muestra por segundo. Por tanto el ordenador lo que hace es tomar una de esas mediciones y descartar las otras 7. Puede parecer que un segundo es poco tiempo, pero ante una aceleración rápida, dentro de ese segundo podrá haber diferencias de presión importantes. Es por eso por lo que los picos de potencia difieren, pero en general la gráfica se alinea perfectamente.
- En segundo lugar, es evidente que la localización en la zona de transmisión también afectará a la medida. Y viendo esos picos se puede ver perfectamente cuál es la diferencia entre los tres. bePRO, estando colocado en los pedales, es el que registra algo más de potencia que los demás.
Las diferencias no son importantes. Revisando la gráfica en el punto de mayor potencia estamos hablando de unos 15W de diferencia en 500W. Es un 3%, pero repito que es un pico puntual y que hay más detalles en la ecuación.
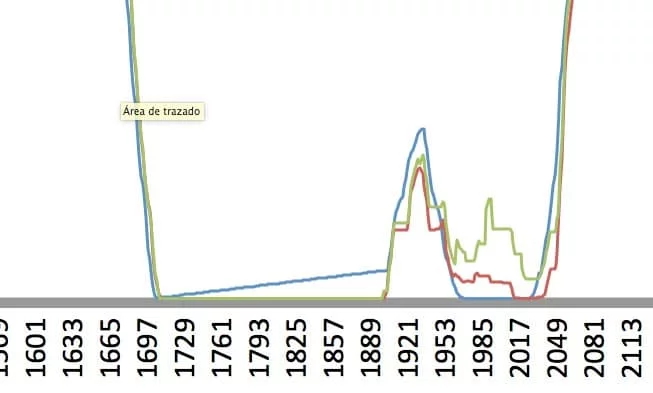
Antes de pasar a la siguiente gráfica, quiero ampliar una zona que produce bastante extrañeza, y creo que merece explicación.
Ahí hay cosas raras, ¿verdad? En el código de tiempo 1.697 (son segundos, por tanto 28 minutos de actividad) me paro al completar una subida. Aprovecho para hacer fotos de otro dispositivo que estaba probando en ese momento y anotar unas cosas. Aquí por algún motivo la unidad que graba los datos de Stages no lo interpreta correctamente y tiene una línea en ascenso muy irreal, pero no es eso lo que quiero destacar, pues es una mera diferencia en la captura de datos que al estar suavizado tiene ese comportamiento raro. Me quiero centrar en lo que viene después.
En esa zona estaba realizando una bajada en zona urbana. Es decir, pasos de peatones, badenes, etc. ¿Por qué esos picos tan extraños y diferenciados? Pues se pueden explicar por la forma de registrar la cadencia. En este caso, al estar bajando una pendiente bastante pronunciada en la que casi no hace falta pedalear (porque además con los badenes, es obligado frenar constantemente) la cadencia es muy baja.
Para registrar la potencia, el potenciómetro necesita datos de presión y de velocidad angular (es decir, cadencia). Hay que tener en cuenta que en cuanto a los datos de cadencia las cosas difieren; por ejemplo Stages registra cadencia a partir de 30rpm, mientras que bePRO son 20rpm ya que he conseguido registros en torno a esa cifra. Por su parte, PowerTap tiene una cadencia estimada (pues a diferencia de los otros dos, por su posición no puede registrar una cadencia real). Así que ahí tienes explicación para esos picos extraños que se han producido en una situación anómala, algo que no verás en la parte de trabajo de tus entrenamientos o en una competición. La baja velocidad de cadencia, y la falta de una fuerza de torsión elevada hace que la medición no sea demasiado precisa. ¿Cuál de los tres facilita el dato más preciso? Imposible saberlo.
Vamos con uno de los entrenamientos que más me han gustado para poder extraer datos importantes. Una sesión de intervalos cortos con una peculiaridad: estaba muy fatigado después de una competición de trail dos días antes. Enseguida te digo por qué destaco ese cansancio.
En primer lugar, la gráfica suavizada a 30 segundos, pero hay demasiados picos para poder ver algo de forma clara. Sólo vemos que la potencia sube y baja y que la gráfica de Stages normalmente está bastante por debajo, pero quiero que la tengas disponible antes de eliminar todos los pequeños picos (que al final son los más importantes a la hora de determinar la precisión del medidor de potencia).
Vamos a suavizar a 60 segundos.
Pero más de lo mismo, no hay mucha claridad para poder ver datos de forma clara y mostrarte lo que quiero. Así que voy a ir mucho más allá, y a suavizar la gráfica a 5 minutos.
Mucho mejor ahora, ¿verdad?. Bien, aquí lo que podrás ver es que hay dos gráficas que se alinean casi a la perfección, la de PowerTap y la de los pedales de bePRO. Al inicio hay una diferencia de unos 7W entre ellas. Pero la que queda destacada es la de Stages, bastante por debajo de las otras dos.
Es aquí donde se empieza a ver la necesidad de hace las pruebas contando con tres (o más) medidores de potencia. Porque imagina que estuviese enfrentando el buje PowerTap con la biela de Stages. ¿Cómo saber cuál de los dos está midiendo la potencia de forma correcta?. Y más aún, ¿por qué esa diferencia de potencia?. Es aquí donde entra en juego la tercera unidad, que es la que permite darle toda la perspectiva a las pruebas.
Como decía antes, en este entrenamiento estaba bastante fatigado, con las piernas cansadas (un trail de 2.400m de desnivel acumulado tenían la culpa). ¿Por qué esa enorme diferencia entre el medidor de Stages y los otros dos? Fácil, por la forma de medir de los tres. PowerTap mide la potencia total de ambas piernas, bePRO mide cada pierna por separado y Stages mide sólo la pierna izquierda y multiplica por dos para dar la potencia total.
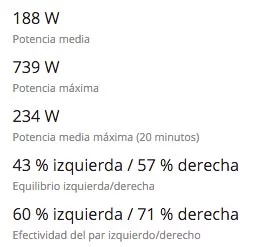
Generalmente mi distribución de potencia suele ser bastante pareja, alrededor de 48-52, predominando algo más la pierna derecha. Así que tras ver los datos obtenidos fui rápidamente a ver cuál había sido la distribución de ese día.
Efectivamente, debido al cansancio acumulado el reparto de fuerza estaba bastante desequilibrado, por lo que Stages está midiendo un 7% menos de potencia. Y esa potencia que mide de menos, es la que está multiplicando por dos, dando por tanto valores bastante más bajos que los recogidos por los pedales bePRO y por el PowerTap G3.
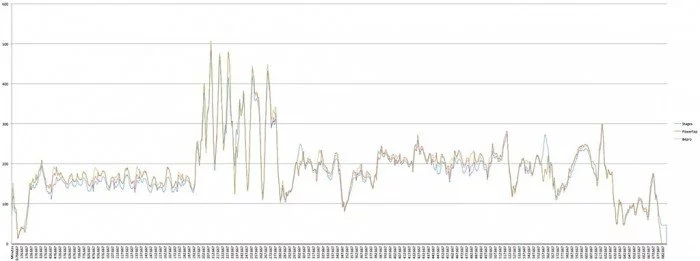
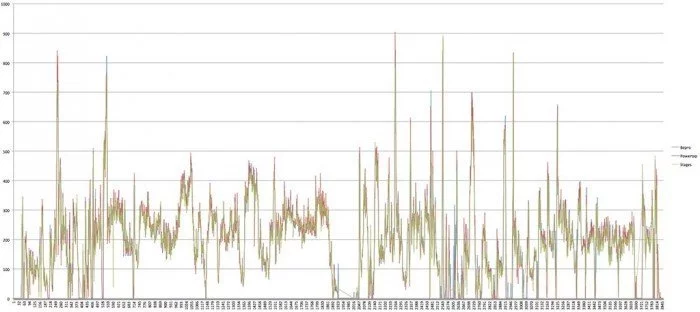
Pasemos a otro día diferente. En primer lugar te quiero enseñar la gráfica sin suavizar, para que veas por qué motivo me gusta subir las imágenes suavizadas (que, en realidad, es lo mismo que haces con tu ordenador de ciclismo cuando seleccionas potencia a 30s, por ejemplo).
Imposible apreciar nada, pero así es como lo verás cuando sincronices tu dispositivo con la plataforma que utilices. No obstante a mi me sirve para ver los picos de cada uno de los medidores y poder juzgar su precisión. Pero vamos con gráfica suavizada.
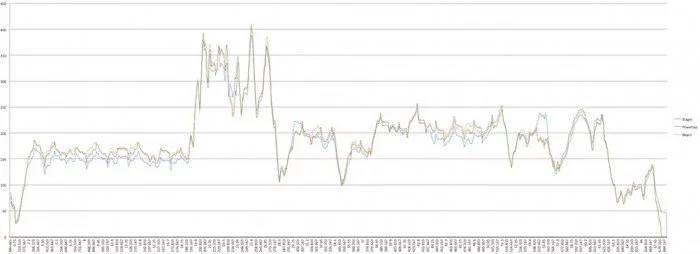
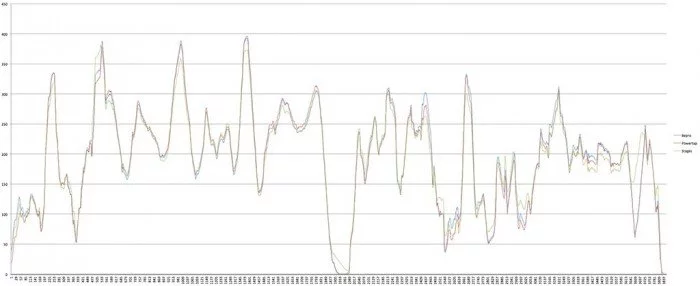
Al inicio de la actividad todo aparece bastante correcto y alineado, al menos hasta la parada que se aprecia en la gráfica. Sí, los picos de potencia puntuales están separados en algunos puntos, pero es totalmente normal por lo ya explicado con anterioridad. La tendencia seguida por las tres gráficas es la misma, coincidiendo los puntos de referencia e inflexión. Hay desviaciones mínimas en algún momento determinado por parte de alguno de ellos, pero no presenta ningún problema en su uso.
Es a partir de la parada cuando comienzan las desviaciones por parte de los tres potenciómetros. Y se puede ver claramente cómo son desviaciones que van aumentando con el paso del tiempo. Ninguno de los tres mide de forma totalmente errónea como para descartarlo directamente, pues las tendencias son coincidentes al igual que los puntos de inflexión. Las gráficas son paralelas y cuando una sube, las otras también. ¿Cómo saber cuál de los tres está dando el dato más preciso?. Imposible saberlo.
Pero la variación y la diferencia de potencia es cada vez mayor, en mi opinión debido a los cambios de temperatura y a cómo han afectado a cada unidad y su velocidad de ajuste ante estos cambios.
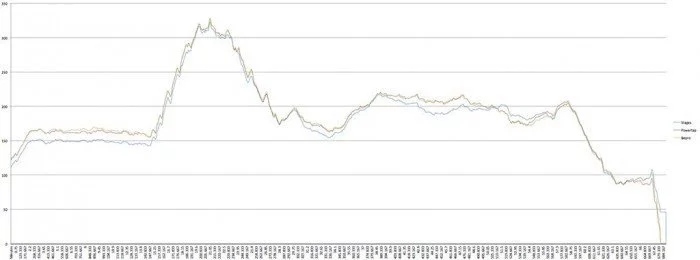
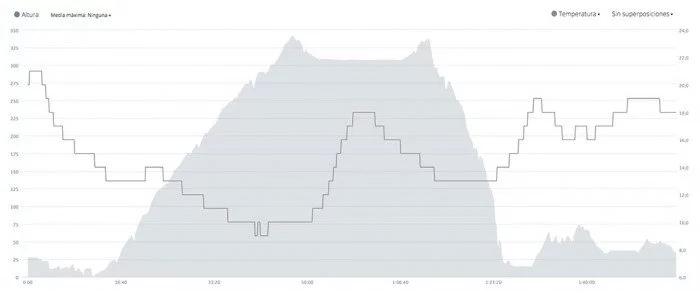
Así que en el siguiente entrenamiento el objetivo era ver cómo reaccionan a las dilataciones de los materiales producidos por la temperatura, pues es una salida con un ascenso constante en el que hay una variación permanente de la temperatura, descendiendo a medida que voy subiendo el puerto. La subida de temperatura central no es real, pues en ese momento estaba parado haciendo diferentes comprobaciones, pero al estar al sol el Edge 520 simplemente se está calentando por dicho motivo. En cuanto vuelvo a emprender la marcha verás que la temperatura vuelve a descender.
La variación de temperatura es de hasta 10 grados. En la parte inicial de la subida debía hacer intervalos de 2 minutos intensos y 1 minuto tranquilo. Aquí las cosas están bastante igualadas o, al menos, de la misma manera que hemos ido viendo en todas las pruebas anteriores, con bePRO y PowerTap correctamente alineados y Stages ligeramente por debajo en términos de potencia (por mi distribución de potencia personal, con predominancia en la pierna derecha).
Tras la parada en el pueblo situado en la parte superior del puerto y esperar al cambio de temperatura sí podemos ver diferencias más acuciadas. Podría haber hecho una calibración manual de los potenciómetros, pero recuerdo que la idea es realizar pruebas en condiciones de uso reales. Además, tengo la certeza que lo más normal no es andar parando para realizar calibraciones manuales, sino que tú como usuario de un medidor de potencia simplemente calibrarás al inicio de la ruta (como mucho).
El PowerTap G3, como he indicado anteriormente, realiza calibraciones constantes cuando no estás pedaleando, por lo que debería ir ajustando continuamente conforme la temperatura va cambiando.
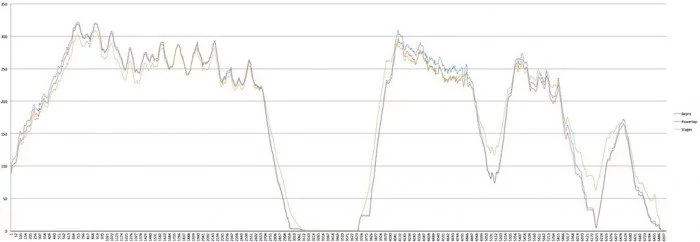
Pero si durante la subida todo cuadraba de forma bastante correcta, es a la bajada cuando hay discrepancias. En esa segunda parte me quiero olvidar de la lectura de Stages, pues esos picos más elevados cuando la potencia baja no son causados por el medidor de potencia, sino por la unidad que está grabando datos.
Los dos picos de bajada son momentos en los que permanezco parado, pero que al suavizar la potencia no llega hasta cero (y en el caso de Stages, la unidad tarda un poco más en «anotar» que no hay potencia).
Pero quiero que te fijes en otros detalles, no sólo en el más obvio. Si te fijas en el fragmento de la subida, bePRO y PowerTap están alineados casi a la perfección, con Stages ligeramente por debajo (por medir potencia de pierna izquierda y multiplicar los dos).
Tras la parada podemos apreciar que ahora las curvas que coinciden son las de Stages y PowerTap, quedando la gráfica de bePRO por encima, aunque poco a poco vuelven a alinearse perfectamente a medida que voy acercándome al final del entrenamiento.
No hay otra explicación a este comportamiento que la velocidad que tiene cada unidad en ajustarse a los cambios de temperatura. O bien, en cómo afecta la temperatura a cada unidad.
De nuevo resalto uno de los mejores aspectos del PowerTap G3: su autocalibración constante. Así que mientras los otros dos medidores de potencia necesitan unos minutos para ajustarse (ambos cuentan con ajuste automático por cambio de temperatura), el PowerTap G3 es mucho más rápido en hacerlo, porque cada vez que dejamos de dar pedales se vuelve a calibrar de forma totalmente automática.
Si al terminar la bajada me hubiese detenido para hacer una calibración manual desde el dispositivo el ajuste de la potencia hubiese sido más rápido en las otras dos unidades.
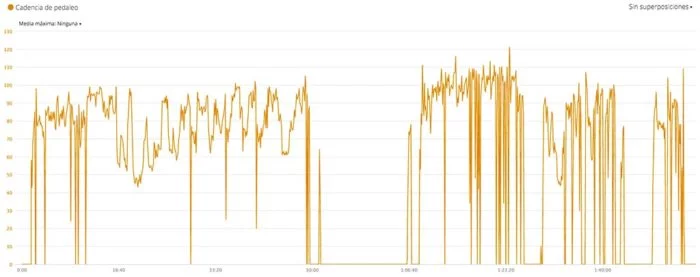
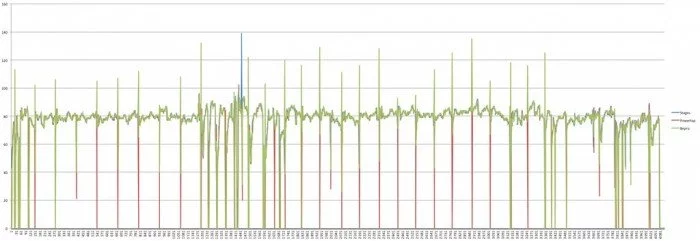
¿Y qué hay de la cadencia? Pues no hay nada que reseñar. En ningún momento he podido apreciar comportamientos extraños. En las gráficas se pueden ver picos por arriba y por abajo, pero son simplemente momentos en los que he dejado de dar pedales y son los datos recibidos por la unidad. Por algún motivo PowerTap envía un pico a cero y bePRO un pico muy alto, pero eso no afecta a la media final ni, principalmente, a la lectura de cadencia que tenemos durante el entrenamiento.
Como puedes comprobar los tres dispositivos detectan los mismos datos de cadencia, incluso a pesar de que el PowerTap G3 sólo puede hacer una estimación de las pedaladas por minuto.
Mi opinión
El PowerTap G3 se ha aupado en los últimos años como uno de los medidores de potencia de referencia. Es fácil comprender por qué: muy sencillo de utilizar, no tiene incompatibilidades en su instalación y los datos obtenidos son totalmente fiables.
Solo hay una duda que se puede presentar. ¿Es el potenciómetro perfecto para ti?
Lo que debes decidir es si te interesa tener el medidor de potencia en una rueda. Dependerá de si usas una rueda para todo (competir, entrenar, escalada, etc), o por el contrario tienes tu juego de ruedas de entrenamiento y los días de competición usas algo especial dependiendo del tipo de prueba en el que participes. También depende mucho del tipo de competiciones a las que asistas, ya que carreras cortas donde se circula a rueda y respondes a ataques los datos de potencia no tendrán mucho peso a la hora de decidir si respondes a ese ataque, pero para pruebas de mayor duración se puede convertir en algo imprescindible.
Si sólo usas un juego de ruedas no encontrarás ninguna opción más sencilla, fiable y económica. Pon un buje PowerTap en tu vida y olvídate de todo lo demás. Pero si usas varios juegos de ruedas entonces debes decidir si comprar varias unidades para los diferentes juegos o decidir en cuál de ellos quieres tener la información de potencia.
Es una de las opciones más económicas a la hora de medir la potencia, y lo hace de forma precisa. Sólo puedo ponerle dos pequeñas pegas: estar obligado a tenerlo sólo en una rueda y no ver la distribución del pedaleo. En ambos casos por el propio diseño del dispositivo y su ubicación. Al no disponer de potencia por cada pierna podemos estar perdiendo datos que otros medidores sí nos aportan, pero lo cierto es que ninguno de esos dos puntos me impediría entrenar de forma regular.
¿Te ha gustado la prueba?
Espero que esta review sea de tu agrado. Son muchas las horas necesarias para hacer cada una de ellas. Si te gusta el trabajo que hago recuerda que tu apoyo es fundamental.
No olvides compartir la prueba en tus redes sociales y con amigos, para que ellos también puedan estar informados. Y no dudes en comentar y suscribirte a los comentarios, muchas veces encontrarás respuesta a preguntas que no se han tratado en el texto de la prueba. Puedes usar los comentarios de la prueba como un foro y compartir no sólo tus dudas, sino también tus opiniones del reloj con el resto de lectores.
Comprar PowerTap G3
Tamalpais, el distribuidor de PowerTap en España, ha reducido el precio del PowerTap G3 recientemente. Puedes comprar el buje desde sólo 599€. Las ruedas completas comienzan en 699€, con el modelo de entrenamiento que has podido ver en esta prueba.
No tengo ningún tipo de relación con Tamalpais, por lo que en caso de comprar directamente a través de su tienda no hay comisiones de ningún tipo. Así que si te ha gustado la prueba y quieres ayudar a que la página continúe, en tus compras en Amazon hazlas a través de este enlace, pues con ello ayudarás a sufragar los gastos. ¡Gracias!





Hola, una pregunta, hay alguna diferencia entre el PowerTap G3 y PowerTap G3 Montaña aparte del peso? Porque el primero cuesta 599€ y el segundo 399€.
Buen artículo.
Gracias Alex.
El modelo de montaña es para MTB, mientras que el G3 normal es para ciclismo de carretera.
Muchas gracias Eduardo por el post. Quiero comprarme un medidor de potencia, he visto que este es económico de segunda mano y con el análisis que has hecho estoy decidido…
Te quería hacer una pregunta a ver si puedes ayudarme. Conoces algún entrenador (a distancia) que me marque entrenamientos, me ayude a mejorar y más con la potencia?
Muchas gracias
Manuel
No conozco ninguno que esté bien centrado en ciclismo y el entrenamiento por potencia. De todas formas con una búsqueda de Google seguro que consigues un buen puñado de candidatos.
Sí te puedo decir que mi entrenador para triatlón es este: https://intelligentrunning.es/
Antes de elegirlo, echa un vistazo a estos consejos.
Muchísimas gracias Eduardo. Tendré en cuenta tus consejos!
Saludos!
Hace poco más de 3 meses adquirí un powertap de mtb q transmite frecuencia mediante ant + y blutooht me a surgido un problema en las lecturas que va a 0 deja de medir por una fracción de segundos , a la pila ya se la cambie 2 veces..
Como puedo solucionar el problema?
Saludos
Será problema de señal, coloca tu dispositivo en el lado izquierdo del manillar (o muñeca derecha en caso de ser un reloj)
Hola, tengo esta rueda desde hace años y estoy muy contento, pero empiezo a competir en cicloturistas y no se hasta que punto merece la pena buscar otro sistema y poner una pareja de ruedas de mayor calidad. Bajo tu opinión con la calidad de la rueda (peso, rodamientos etc..), merece la pena el cambio, hay mucha diferencia con una rueda de algo mayor calidad?
Gracias y enhorabuena por el análisis..
La rueda básica de entrenamiento es eso, para entrenamiento. No destaca en nada más allá de su precio.
Pero siempre puedes usar el buje para montarlo en una rueda de más calidad con un aro de aluminio o carbono al gusto.
Hola. Excelente artículo. Después de pasar por un Stages de biela, con sus pros i contras, me decidí a cambiar a algo más con medición en ambas piernas, así que he comprado uno a los pedales que desgraciadamente no tendré cuando lo necesito, al inicio de la temporada de entreno.
Estoy valorando en comprar un G3 de segunda mano temporalmente i tu análisis me ha servido para acabar de decidirme. Sólo quería hacerte la consulta ¿has notado desconexiones entre aparatos? Utilizo un Edge 810.
Gracias
No, jamás tuve problemas de conectividad con el G3.
Eduardo! Excelente articulo ,
El Powertap G3 es solo para bicicletas de 11 velocidades??
Saludos
Se puede usar en 10-11 velocidades cambiando el núcleo del buje en cada caso. Creo que para 12 velocidades Powertap todavía no ha lanzado núcleo.
Hola, Eduardo.
Después de analizar las opciones de potenciómetros y mis necesidades, casi seguro optaré por el Powertap G3 después de tu análisis y buena opinión.
En cuanto a los datos de cadencia y potencia (ahora tengo los sensores de Garmin), podría dejar de utilizarlos. Previo a hacerlo, ¿difieren en fiabilidad los datos de cadencia y velocidad con los de estos sensores? Entiendo que el de velocidad debe ser el más ajustado, pero no sé cual es la situación con la cadencia.
Gracias por tu atención.
Sí, en ambos casos está basado en acelerómetros y son igual de fiables que los sensores de Garmin.
Hallo, i trained today for the first time with the PowerTap g3. My sigma rox 11.0 found him quickly and gave a good power. But even i put the richt wheel size, the speed was correct, but distance and average speed were absolute absurd wrong. A lap of 32km was measured as 7,6km… what is the problem.
You should check how calibration of external speed sensor is done in the Sigma Rox 11.0. You have to calibrate the device with the wheel circumference.